Before we dive into this complete guide, here’s a helpful link to try an advanced Tile visualizer tool that can simplify your home renovation journey from the very first step.
Planning a home renovation can be overwhelming. With countless tile patterns, materials, colours, and finishes to choose from, visualising the final result often becomes the hardest part. That’s where a tile visualizer completely changes the game. It helps homeowners like you preview tile designs in real spaces, compare styles instantly, and make confident decisions without guesswork or expensive mistakes.
This guide explores how the tool works, why it’s becoming a must-have in modern renovation projects, and how you can use it to design your dream home effortlessly.
Why Every Homeowner Needs a Tile Visualizer Today
A home renovation is both exciting and stressful. With traditional planning, you rely on imagination, sample tiles, or 2D catalogues—but none truly show what your room will look like. A tile visualizer bridges the gap between imagination and reality.
It lets you:
See how tiles will look on your walls or floors
Experiment with multiple colours, textures, and finishes
Avoid mismatched tones and costly tile replacements
Make decisions faster with more clarity
Instead of visualising in your head, you get a realistic digital preview within seconds.
How a Tile Visualizer Works: A Simple Breakdown
The technology behind these tools is surprisingly user-friendly. You don’t need technical skills or design expertise.
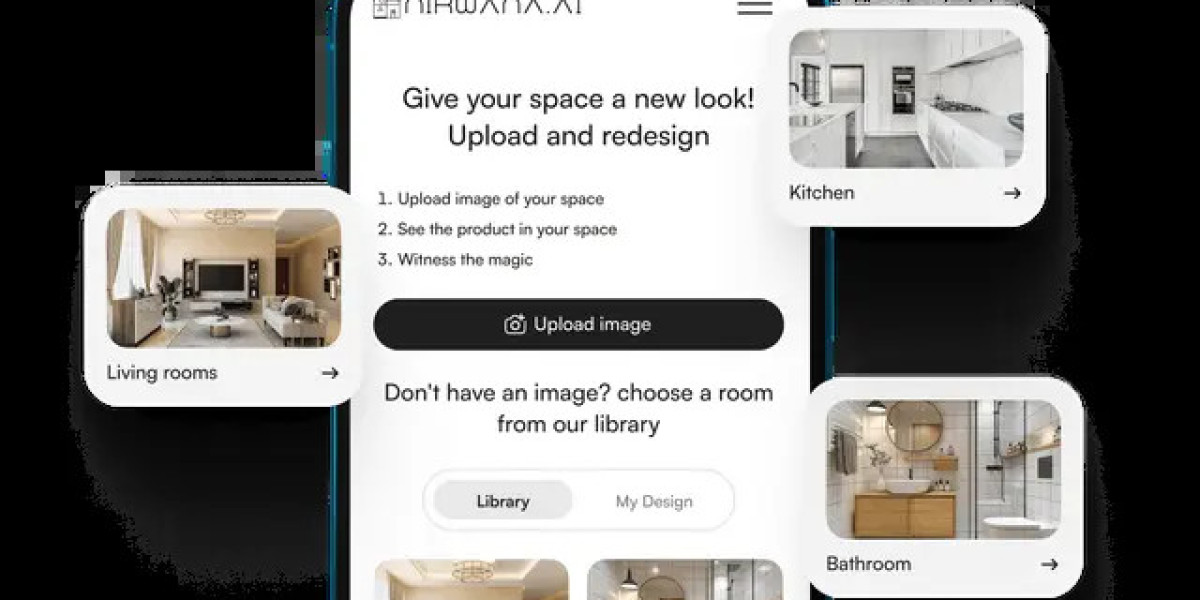
Upload or Select a Room Layout
You can upload a picture of your room or choose from predefined layouts like kitchens, bathrooms, living rooms, etc.
Choose From Multiple Tile Options
Browse hundreds of tiles—ceramic, porcelain, marble, vitrified, stone-finish, and more.
Apply Tiles Instantly
With one click, the tool automatically maps tiles onto the floor or wall with realistic lighting and perspective.
Compare Designs Side-by-Side
Experiment with multiple tile combinations until you find the perfect match.
This quick, interactive experience saves countless hours and eliminates confusion.
The Major Benefits of Using a Tile Visualizer for Renovation
1. Eliminates the Risk of Wrong Choices
Tiles may look one way in a showroom but completely different in your home’s lighting. A visualizer solves this by showing the tiles exactly as they would appear in your space.
2. Helps You Explore Your Creativity
Ever wondered how a bold marble pattern or vintage Moroccan design would look? You can try it instantly—no commitment, no fear.
3. Saves Both Time and Money
By reducing trial-and-error purchases, it prevents renovation delays and budget overruns.
4. Makes Decision-Making Smooth for Families
When everyone sees the final look upfront, choosing tiles becomes easier and conflict-free.
5. Provides Professional-Quality Results
You get a design preview similar to what interior designers provide—without paying extra.
Top Design Trends You Can Explore Using a Tile Visualizer
Large Format Tiles
They create seamless patterns and make small rooms look spacious.
Textured Stone-Inspired Tiles
A favourite in modern luxury homes, giving an earthy yet premium feel.
Matte Finishes
Perfect for contemporary kitchens and bathrooms that need subtle elegance.
Wood-Look Tiles
Combine rustic charm with durability—great for living rooms and balconies.
Patterned Tiles
Ideal for feature walls and statement floors.
Using a visualizer helps you test each trend before committing.
How a Tile Visualizer Helps Different Areas of Your Home
Kitchens
Test backsplash combinations, mix-and-match patterns, and explore stain-resistant options.
Bathrooms
Preview moisture-resistant tiles, anti-skid flooring, and contrast wall designs.
Living Rooms
Visualize large floor tiles, marble-finish luxury styles, or soft-tone matte tiles.
Bedrooms
Experiment with warm tones, elegant stones, or wood-finish tiles.
Balconies & Outdoor Areas
Check how weather-resistant tiles appear in natural light environments.
Choosing the Right Tiles Using a Tile Visualizer
A visualizer doesn’t just show how the tile looks—it helps you evaluate deeper design elements:
Lighting Compatibility
See how tiles appear under bright lights, natural sunlight, or warm indoor lighting.
Space Enhancement
Use light-coloured tiles for small rooms and bold textures for spacious areas.
Theme Consistency
Ensure all rooms follow a unified style or complement each other.
Durability Considerations
Preview functional tiles for moisture-heavy areas and high-traffic zones.
Common Mistakes Homeowners Make Without Using a Visualizer
Choosing tiles only based on showroom appearance
Misjudging how grout colours affect the overall look
Picking designs that clash with furniture or décor
Underestimating how dark tiles shrink a room
Overlooking slip-resistance and maintenance needs
A visualizer eliminates all these issues before they occur.
How Professionals Use Tile Visualizers to Perfect Designs
Interior designers, architects, and contractors rely on these tools because:
They create accurate client previews
They speed up the approval process
They prevent installation errors
They improve communication with customers
Homeowners can benefit just as much—even without professional expertise.
A Step-by-Step Guide to Using a Tile Visualizer Effectively
Step 1: Select a Room Type or Upload Your Photo
The more accurate the photo, the better the preview.
Step 2: Choose Tile Categories
Marble, wood, digital prints, granite, ceramic, matte, glossy—explore all options.
Step 3: Apply Tiles to Walls and Floors
Switch between finishes to find a perfect match.
Step 4: Adjust Layout or Patterns
Try vertical stacking, horizontal layouts, herringbone, or diagonal patterns.
Step 5: Save and Compare Designs
Share with family or contractors before placing your order.
Frequently Asked Questions
Is a tile visualizer accurate?
Yes, modern tools provide highly realistic results using AI and 3D mapping technologies.
Can I upload my own room picture?
Absolutely—uploading your photo gives you the most accurate preview.
Do I need design skills to use it?
Not at all. It’s built for beginners, homeowners, and professionals alike.
Does it help save money during renovation?
Yes, it prevents wrong purchases and supports better planning.
Can I test multiple tiles together?
You can compare different patterns, colours, and finishes side-by-side.
Final Thoughts
A tile visualizer is more than just a digital design tool—it’s a complete decision-making companion for homeowners planning renovations. It helps you explore styles freely, prevent expensive mistakes, and bring your dream spaces to life with absolute clarity. Whether you’re redesigning a kitchen, bathroom, bedroom, or entire home, this tool makes the planning process smoother, smarter, and far more exciting. With the right visualizer, you can step into your future home even before the tiles are laid—ensuring your renovation turns out exactly the way you imagined.