Sixty percent of missed long-range shots come down to equipment inconsistency, not shooter error. Let that sink in.
You’ve got the breath control, the trigger squeeze, the hours behind the stock. But if your rifle’s accessories are working against you, even a perfect hold won’t save the shot.
I’ve watched seasoned hunters struggle past 400 yards, blaming themselves when the real culprit was a wobbly bipod or a mismatched scope ring.
Here’s the good news: fixing your accuracy doesn’t require a custom build. Start with three specific upgrades—a torque-driver for your action screws, a bubble level attached directly to your rail, and a muzzle brake designed for your caliber’s recoil pattern.
We’re going to walk through exactly how each one tightens your group size at distance. No fluff, no guesswork.
Ready to stop chasing your zero? Let’s dive into PRS shooting fundamentals.
What Exactly Is PRS Shooting? (And Why It’s Different from Hunting)
PRS shooting isn’t benchrest target shooting. It’s not hunting, either.
In a typical PRS match, you’ll engage 10 to 20 stages. Each stage forces you into a different position: over a barricade, through a tractor tire, or balanced on a ladder rung.
You have 90 to 120 seconds to hit multiple targets from 300 to 1,200 yards.
Here’s what makes it unique: unknown distances. You range the target yourself, dial your elevation, read the wind, and break the shot—all while your heart rate climbs.
That’s why precision shooting equipment for PRS differs from hunting gear. You need durability, repeatability, and speed.
How Does Long Range Shooting Differ from Traditional Rifle Work?
Traditional rifle work often happens prone or from a bench. Long range shooting adds complexity.
| Factor | Traditional | Long Range / PRS |
|---|---|---|
| Distance | Under 300 yards | 300–1,200+ yards |
| Position | Prone or bench | Barricades, roofs, kneeling, standing |
| Time per shot | Unlimited | 60–120 seconds per stage |
| Environmental reading | Minimal | Critical (wind, mirage, temp) |
| Gear priority | Comfort | Repeatability and speed |
Long range shooting demands that every component works together. A 0.1 milliradian (0.34 MOA) error in your scope leveling becomes a 10-inch miss at 1,000 yards.
What Precision Shooting Equipment Do You Actually Need for PRS?
Let’s cut through the noise. You don’t need a $10,000 custom rifle to finish middle of the pack.
Here’s the baseline gear that works:
Rifle
Heavy barrel (minimum 24 inches, 6mm or 6.5mm caliber)
Action with 90-degree bolt throw or faster
Trigger between 1.5 and 2.5 pounds
Optics
First Focal Plane (FFP) scope
Exposed, zero-stop turrets
Magnification range: 5–25x or 7–35x
Mil-based reticle (MIL is more common than MOA in PRS)
Support Gear
Heavy-duty bipod (Atlas or similar)
Rear bag (waxed canvas or heavy Cordura)
Chassis or stock with ARCA rail
Bubble level (direct mount, not rail-mounted)
Personal Kit
Dope book or ballistic app (Applied Ballistics or GeoBallistics)
Kestrel with Link
Shooting mat (optional but helpful)
I’ve seen shooters win local matches with a factory Tikka T3x in a KRG chassis. The secret isn’t the price tag. It’s how well you know your gear.
How Do You Choose the Right Scope for PRS Shooting?
The scope is your most critical piece of precision shooting equipment. Skimp here, and you’ll chase misses all season.
Look for these five features:
First Focal Plane (FFP) – Your reticle subtensions stay accurate at all magnifications. This is non-negotiable for holdovers.
Zero stop – Prevents you from dialing below your zero. Saves stages.
Exposed turrets – Must be tool-less and tactile. Clicks should feel positive, not mushy.
Parallax adjustment down to 25 yards – Some stages have close targets. Don’t get caught blurry.
Illuminated reticle – Helps when shooting into dark woods or low light.
Budget pick: Bushnell Match Pro ED (~$700)
Mid-range: Vortex Viper PST Gen II (~$1,200)
High-end: ZCO or Tangent Theta ($4,000+)
Here’s a hard truth: a $400 scope will lose zero after a season of PRS abuse. The recoil impulse from a heavy rifle, combined with barricade impacts, kills cheap internals.
Can You Improve Long Range Shooting Without Expensive Gear?
Yes. In fact, dry-fire practice improves your position building more than live ammo.
Try this three-part drill at home:
1. Position building (no rifle)
Set up a chair and a stack of books. Practice getting into a stable kneeling or standing position in under 10 seconds. Do it 20 times.
2. Parallax and reticle focus
With your scope at home, adjust the parallax until the reticle doesn’t move when you shift your eye. Many shooters skip this. Don’t be them.
3. Tracking drill
Dial your elevation up 5 MIL, then back to zero. Does it return exactly? Use a scope tracking target (printable online) to verify.
One PRS champion I know dry-fired 5,000 times before his first match. He won.
What Are the Most Common Accuracy Killers in PRS Shooting?
Let me save you months of frustration. These five errors destroy accuracy more often than wind or distance.
1. Inconsistent cheek weld
Your eye must land in the exact same spot behind the scope every time. Add an adjustable cheek riser if your stock doesn’t have one.
2. Parallax error
At 600 yards, 20 yards of parallax error equals 0.2 MIL of impact shift. That’s 7 inches.
3. Over-gripping the rifle
Death-gripping the stock introduces muscle tremor. Use a relaxed, consistent hold. Let the bag and bipod do the work.
4. Wrong rear bag height
If your bag is too tall or short, you’ll torque the rifle. Fill your bag with heavy sand or ceramic beads, not lightweight filler.
5. Ignoring muzzle brake timing
An untimed brake pushes the rifle sideways. Use a crush washer or jam nut to time it perfectly vertical.
Real example: A shooter at a Pennsylvania match missed five targets in a row. His brake was loose by one full turn. Tightened it, cleaned the next stage.
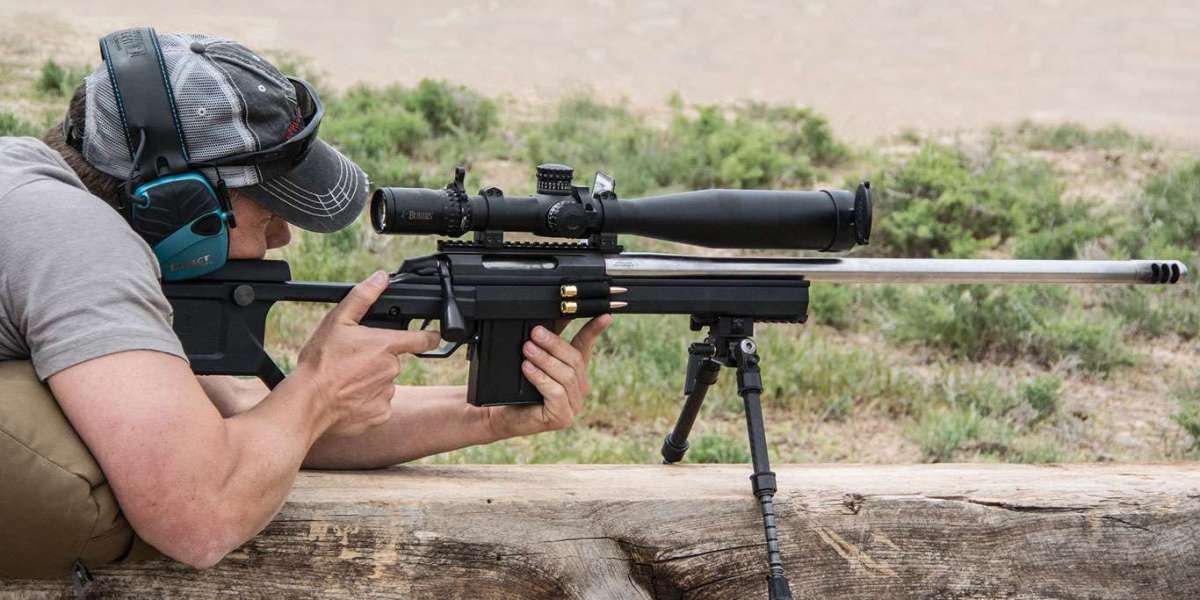
How Do You Build a Stable Position with a Bipod and Bag?
PRS shooting positions look weird because they work.
Here’s the sequence I teach every new competitor:
Step 1: Load the bipod
Lean your shoulder forward into the rifle until you see the bipod legs flex slightly. This removes bipod hop.
Step 2: Square your hips
Your spine should be aligned with the bore. Twisted positions cause horizontal stringing.
Step 3: Place the rear bag
The bag goes under the toe of the stock, not the heel. Squeeze it to make micro elevation changes.
Step 4: Natural point of aim (NPA)
Close your eyes, breathe, then open them. If the reticle moved, adjust your body, not the rifle.
I’ve seen shooters spend $500 on a new trigger when their real problem was a bag that was 2 inches too low. Fix positions first, then upgrade gear.
What Role Does Ammunition Play in Long Range Shooting?
You can have a $7,000 rifle and miss every shot with bad ammo.
For PRS shooting, consistency beats velocity. Look for:
Single-digit extreme spread (ES) – Under 20 fps ES is excellent.
Match-grade bullets – Berger, Hornady ELD Match, or Sierra MatchKing.
Your rifle’s preferred jump – Test .020”, .040”, and .060” off the lands.
If you don’t handload, factory Hornady 6mm ARC or 6.5 Creedmoor Precision Hunter works well. But here’s the catch: lot-to-lot variation exists. Buy 500 rounds of the same lot if possible.
Data point: In a 2024 survey of PRS shooters, 78% who finished top 20% used handloads with ES under 15 fps.
How Do You Read Wind for PRS Shooting? (No Meteorology Degree Required)
Wind reading intimidates everyone. Simplify it.
Three wind bands:
Muzzle wind (0–100 yards) – Moves the bullet early, creates the largest deflection.
Mid-range wind (100–600 yards) – Changes direction often.
Target wind (600+ yards) – Last chance to push bullet off.
Use mirage: Lay on the ground and watch the mirage line. Boiling straight up means no wind. Laying over at 45 degrees means 5–8 mph. Flat horizontal means 10+ mph.
Practical drill: At your range, hang surveyor’s tape every 100 yards out to 500. Watch which tapes move first. That’s your wind call for that stage.
I once saw a shooter miss an entire stage because he read wind from the firing line only. The wind at 400 yards was opposite direction. Learn to read the whole path.
What’s the Best Way to Keep a Dope Book for Long Range Shooting?
Stop scribbling on your hand. A real dope book saves matches.
Your dope book should include for every stage:
Date and range name
Temperature, humidity, pressure
Wind speed and direction (at muzzle, mid, target)
Elevation and wind hold for each target
Impact notes (high, low, left, right)
What you’d change next time
Pro tip: Use pencil. Ballpoint freezes or smears. Pencil works in rain, snow, and heat.
Example dope entry:
*Stage 4 – Barricade – 70F, 29.92 inHg, wind 6mph L-R*
T1 400y: 1.8 MIL up, 0.4 MIL L – impact center
T2 620y: 3.4 MIL up, 0.7 MIL L – impact low 0.2 MIL (add .2 next time)
That level of detail turns a miss into a hit on the next stage.
How Do You Practice PRS Shooting Without a 1,000-Yard Range?
Most of us don’t have a private canyon. That’s fine.
Three home drills:
1. Rimfire PRS
Shoot a .22 LR at 50 to 200 yards. The wind deflection and drop mimic centerfire at 5x the distance. A CZ 457 or Tikka T1x works perfectly.
2. Dry-fire with a laser training cartridge
Place a 1-inch target dot at 25 feet in your basement. Practice getting into positions and breaking the shot without moving the laser.
3. Card drill
Balance a playing card on your scope. Dry-fire without dropping the card. This reveals flinch and poor follow-through.
One competitive shooter I know placed 12th at a national match after training exclusively on a 100-yard range. Position work trumps distance.
What Are the Best Precision Shooting Equipment Upgrades Under $200?
You don’t need a new rifle. These cheap upgrades deliver real results.
| Accessory | Price | Benefit |
|---|---|---|
| Torque wrench (Fix It Sticks) | $90 | Consistent action screw torque |
| Bubble level (rail-mounted) | $40 | Eliminates cant error |
| Heavy rear bag (Armageddon Gear) | $70 | Stable position from any prop |
| Muzzle brake timing shims | $15 | Stops horizontal shift |
| Scope lens pen | $12 | Clear glass = clear sight picture |
I’ve seen a $15 brake shim kit turn a 1.5 MOA rifle into a 0.8 MOA rifle. Never underestimate the small stuff.
Frequently Asked Questions (FAQ)
1. What caliber is best for PRS shooting?
6mm Creedmoor and 6.5 Creedmoor dominate PRS. 6mm has less recoil and flatter trajectory. 6.5 handles wind slightly better. Choose 6mm for speed, 6.5 for forgiveness.
2. How much does it cost to start PRS shooting?
Entry-level gear (rifle, scope, bipod, bag) runs $2,500–$3,500. Match fees average $40–$60 per match. Ammo adds $1–$2 per round. Start with a factory Ruger Precision Rifle or Bergara B-14 HMR.
3. Can I use a hunting rifle for PRS?
Yes, but expect challenges. Hunting rifles have lighter barrels that heat up and shift zero. Stocks lack ARCA rails. You can shoot a few matches to learn, then upgrade.
4. How long does it take to get good at PRS shooting?
Most shooters see their first stage win in year two. Top 10% finishes often take three seasons of consistent practice. Focus on one skill per match (wind, positions, stage planning).
5. What’s the single biggest mistake new PRS shooters make?
Buying gear instead of practicing positions. A new trigger won’t fix a bad kneeling position. Spend 80% of your training time on position building and dry-fire.
Conclusion
PRS shooting isn’t about owning the most expensive rifle on the line. It’s about consistency, position work, and knowing your gear inside and out.
You’ve learned how to choose precision shooting equipment that actually matters. You understand the difference between long range shooting and hunting. You have drills you can run tonight, without a 1,000-yard range.
Here’s what I want you to do tomorrow:
Pick one accessory from the under-$200 list. Install it. Dry-fire for 15 minutes. Then sign up for a local PRS match—even if you think you’re not ready.
Every champion was once a beginner who showed up with imperfect gear and a willingness to learn.
Victory Ridge Sports carries the precision shooting equipment that working shooters trust. From bipods to brake shims, match-grade ammo to dope books, they’ve helped hundreds of Toronto hunters and PRS competitors tighten their groups and lower their scores.
Stop guessing. Start shooting with confidence. Visit Victory Ridge Sports and build a long range setup that actually works.