There is a certain pride that comes with walking into a room and knowing that you transformed it with your own two hands. Yet for many homeowners, that pride has always been just out of reach when it comes to architectural details, held back by the intimidation of power tools and the precision required for traditional trim work. The easy install molding kit has changed this dynamic entirely, bridging the gap between professional-quality results and the realistic skill level of the average DIY enthusiast. These thoughtfully engineered systems are designed with one primary goal in mind: to make the process of adding wall molding so straightforward that anyone can achieve a finish that looks like it was installed by a seasoned carpenter. They represent a perfect marriage of smart design and practical functionality, proving that you don't need years of experience to add years of character to your home.
The Philosophy Behind Easy Install Design
What exactly makes a molding kit easy to install? The answer lies in a design philosophy that anticipates common challenges and engineers them out of existence. Traditional molding installation is fraught with potential pitfalls: corners that refuse to align perfectly, measurements that somehow shift between the tape and the saw, and the eternal frustration of pieces that look right until the moment they are permanently attached. Easy install kits address these issues through thoughtful component design. Corner blocks replace mitered joints, eliminating the need for precise angle cuts. Flexible materials allow the molding to conform gently to walls that might not be perfectly flat. Pre-marked alignment guides or included templates take the guesswork out of spacing. Every element of these kits is conceived with the understanding that the person holding them likely wants to spend their weekend enjoying their project, not fighting with it. This user-centered approach transforms what could be a stressful experience into a genuinely enjoyable creative process.
What You Will Find Inside the Box
Opening an easy install molding kit feels a bit like unwrapping a solution to a problem you didn't know could be solved so simply. The contents are carefully curated to include everything necessary for a successful installation, minus the basic tools you likely already own. The star of the show is, of course, the molding itself, typically crafted from lightweight, durable materials like polyurethane or high-density polystyrene that resist moisture and accept paint beautifully. These pieces arrive pre-primed and ready for your chosen color. Alongside the straight lengths, you will discover an array of corner blocks and connector pieces that serve as the kit's problem-solvers, allowing you to create clean intersections without complex cutting. Many kits also include specialized components for navigating obstacles like windows, doors, and electrical outlets. Perhaps most valuable are the inclusion of detailed instructions and sometimes even physical templates that guide you through the layout process. Some premium kits go a step further, providing spacers or alignment tools that ensure perfect symmetry across your entire wall.
Preparing for a Smooth Installation
The foundation of any successful DIY project is preparation, and easy install molding is no exception. Before you even open the box, take time to assess your walls and ensure they are ready to receive their new decoration. Start by thoroughly cleaning the surfaces where molding will be applied, using a mild detergent to remove any dust, grease, or residue that might interfere with adhesion. Pay special attention to kitchens and high-traffic areas where walls may have accumulated invisible films. Once clean, inspect the walls for imperfections. Small bumps can be sanded smooth, and any holes or cracks should be filled with spackle and sanded flush. The goal is to create a perfectly smooth canvas that allows your molding to sit flat and maintain maximum contact. While your walls are drying, lay out all your kit components and familiarize yourself with the pieces. Identify the corner blocks, the straight lengths, and any specialized components. This preparation phase takes perhaps an hour but saves countless hours of frustration during installation.
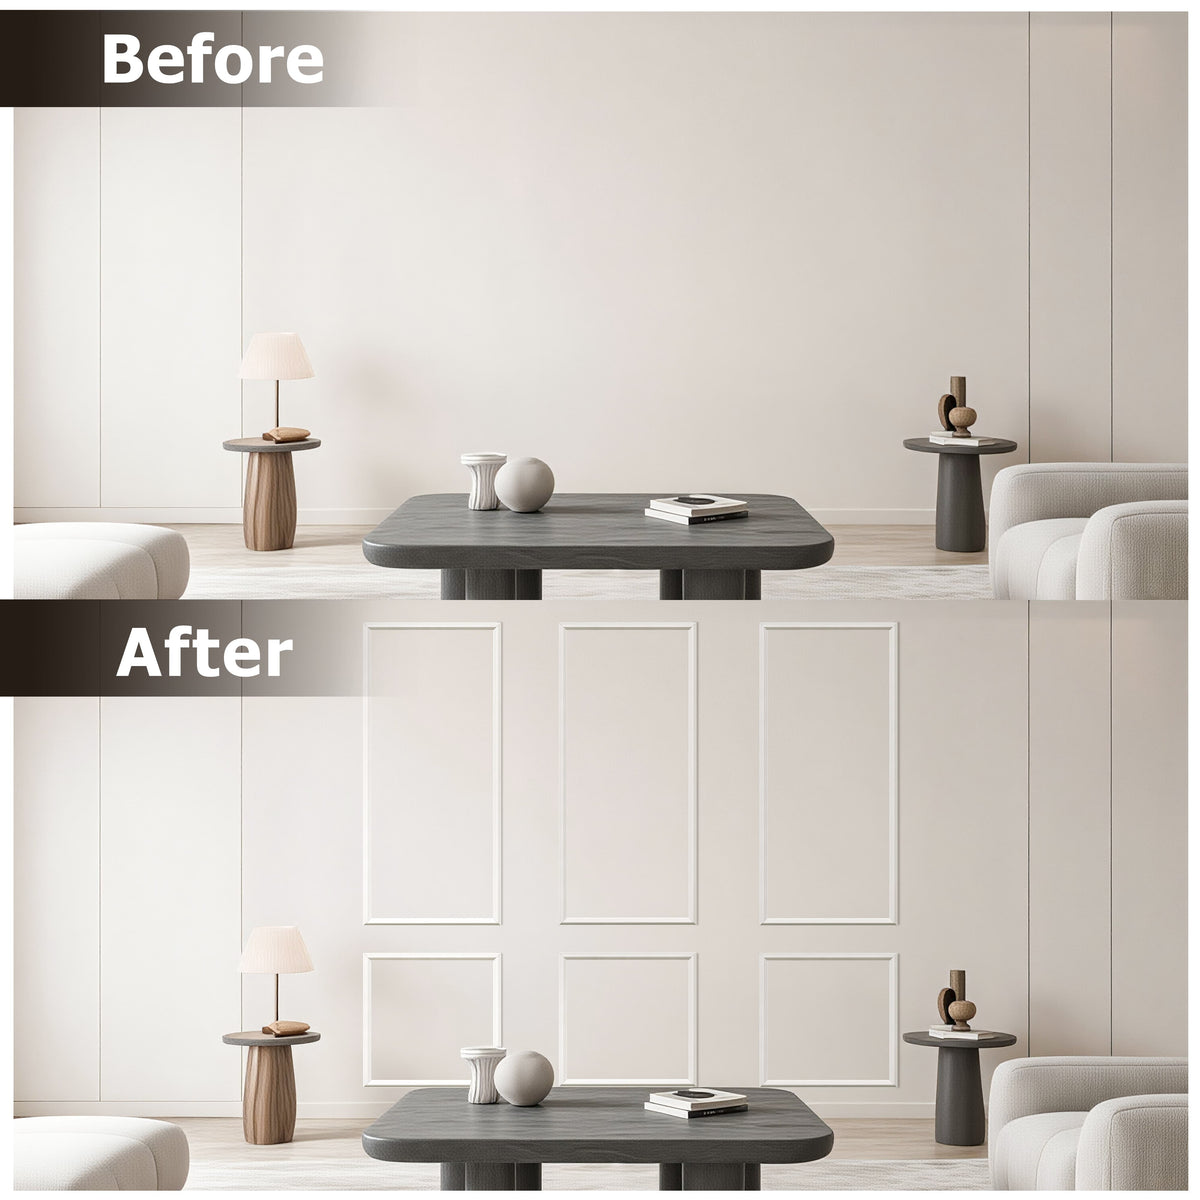
Designing Your Wall Composition
With clean walls and organized components, the creative heart of the project begins: designing your wall composition. This is where you transform a collection of pieces into a cohesive vision that reflects your personal style. Before committing to any permanent placement, use painter's tape to outline your proposed frames directly on the wall. This low-stakes approach allows you to step back, view the composition from different angles, and make adjustments freely. Consider the proportions of your room and how your molding will interact with furniture and architectural features. In a living room, you might want frames that align with your sofa height or create a balanced composition around a fireplace. In a dining room, think about how panels will relate to your table and sideboard. This design phase is pure creative exploration, and the only rule is that you should love what you see. Once you settle on a layout that feels right, use a level and pencil to transfer your design as light guidelines on the wall. These subtle marks will serve as your roadmap throughout installation.
The Installation Experience
The actual installation of an easy install kit is where the philosophy behind the design truly reveals itself. Begin with the corner blocks, as these establish the foundation for your entire composition. Apply a generous bead of construction adhesive to the back of each block, then position it carefully against your pencil guidelines. Press firmly and hold for a moment to ensure initial adhesion. With the corners in place, move on to the straight molding pieces. Measure each length against your marked guidelines, cut if necessary using a simple fine-tooth saw, and apply adhesive to the back. The beauty of the system becomes apparent here: instead of struggling to hold pieces in place while you check alignment, you simply press them into position between the pre-placed corner blocks. The blocks act as natural guides, ensuring perfect placement every time. For longer pieces, painter's tape provides helpful temporary support while the adhesive cures. The entire process is remarkably quiet, clean, and fast. There is no nail gun noise, no sawdust clouds, no toxic fumes. Just the satisfying progress of watching your wall transform piece by piece.
Finishing for a Professional Look
Once all your molding is in place and the adhesive has fully cured, the finishing phase begins, and this is where good installations become great ones. The goal is to create a seamless integration between new molding and existing wall, making the addition look like it has been there since the house was built. Start by inspecting every joint where pieces meet. Apply a thin bead of high-quality paintable caulk to any gaps or seams, then smooth it with a damp finger or small silicone tool. This simple step eliminates shadows and creates the illusion of continuous craftsmanship. Allow the caulk to dry completely, then lightly sand any rough edges or imperfections, being careful not to damage the surrounding wall. Finally, apply primer if your molding requires it, followed by your chosen paint color. Here you have a creative choice: paint the molding the same color as the wall for a subtle, textural effect that reads as integrated architecture, or choose a contrasting color that makes the molding pop as a deliberate design statement. Both approaches can be stunning when executed with care.
Transforming Your Living Space
The true reward of an easy install molding project comes when you step back and see the finished room with fresh eyes. What was once a plain, unremarkable wall has become a feature, a conversation starter, a source of pride. These kits have the power to transform not just individual walls but entire rooms, adding the kind of architectural interest that typically requires significant investment and professional labor. In a bedroom, a simple panel behind the bed creates an instant headboard alternative that adds warmth and sophistication. A home office gains a sense of permanence and professionalism, making video call backgrounds look intentionally designed. Hallways become galleries, powder rooms become jewel boxes, and living rooms become spaces you never want to leave. The beauty of it all is that you created this transformation yourself, with your own hands, using a kit designed to make the impossible feel possible. That is the true magic of easy install molding: it doesn't just change your walls, it changes how you see yourself and what you believe you can accomplish in your home.